


In today's digitally-driven world, secure connectivity is paramount for businesses leveraging cloud services. As enterprises expand their cloud footprint, establishing secure connections between on-premises networks and cloud environments becomes essential. Amazon Web Services (AWS) offers a robust solution for this challenge through its Site-to-Site Virtual Private Network (VPN) service. In this article, we'll delve into the intricacies of AWS Site-to-Site VPN, exploring its features, benefits, and step-by-step implementation guide.
Understanding AWS Site-to-Site VPN
AWS Site-to-Site VPN enables secure communication between on-premises networks and AWS Virtual Private Clouds (VPCs) over the internet. It extends your corporate data center into the cloud, allowing seamless integration of cloud resources with your existing infrastructure. This service encrypts data traffic between the on-premises network and AWS, ensuring confidentiality and integrity.
Key Features and Benefits
Secure Communication: Utilizes IPsec (Internet Protocol Security) protocol to encrypt data, ensuring secure transmission over the internet.
Scalability: Adaptable to varying workload demands, supporting up to 50 VPN connections per AWS Region.
High Availability: Provides redundancy and failover capabilities, ensuring uninterrupted connectivity.
Cost-Effective: Pay-as-you-go pricing model based on usage, eliminating the need for upfront investment in hardware or infrastructure.
Compatibility: Compatible with most VPN devices and third-party VPN solutions, offering flexibility in deployment.
Implementation Guide
Step 1: Prerequisites
An active AWS account.
Access to AWS Management Console.
An existing VPC with a subnet.
A compatible VPN device on the on-premises network.
Step 2: Configure Customer Gateway
Log in to the AWS Management Console.
Navigate to the VPC Dashboard and select "Customer Gateways."
Click on "Create Customer Gateway" and provide necessary information such as IP address and BGP ASN (Border Gateway Protocol Autonomous System Number).
Step 3: Create Virtual Private Gateway (VGW)
In the VPC Dashboard, select "Virtual Private Gateways."
Click on "Create Virtual Private Gateway" and attach it to your VPC.
Note down the VPN ASN provided by AWS.
Step 4: Establish VPN Connection
Navigate to "VPN Connections" in the VPC Dashboard.
Click on "Create VPN Connection" and specify details including customer gateway, virtual private gateway, and routing options.
Download the configuration file provided by AWS, containing necessary VPN settings.
Step 5: Configure VPN Device
Access your on-premises VPN device's management interface.
Import the configuration file downloaded from AWS.
Configure IPsec parameters including encryption algorithms, pre-shared key, and tunnel endpoints.
Verify connectivity and establish the VPN tunnel.
Step 6: Update Route Tables
Update route tables in your VPC to route traffic destined for the on-premises network through the VPN connection.
Ensure appropriate security group and network ACL settings to allow traffic flow.
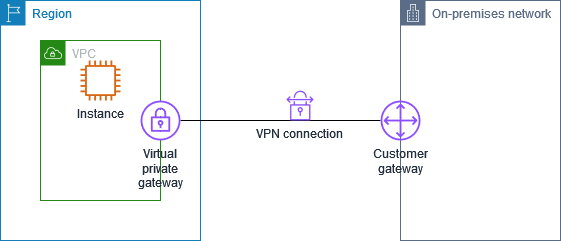
The final infrastructure looks like the following:V
Please refer this link for more advanced architecture with Site-to-Site VPN and for more information about IPsec check this link